Magnet Free-Fall Experiment
Mark 2

The Mark 2 magnet free-fall objects consist of a 3D printed plastic shell, XPS foam encasement layers, Arduino Nano 33 BLE Rev2, PowerBoost 500 Basic, a 3.7V Lipo 250mAh Battery, and magnets. The Mark 2 has two RY04X0 magnets attractively coupled.

Results

Grade: B
  • Max Acceleration: 12.1356 m/s2
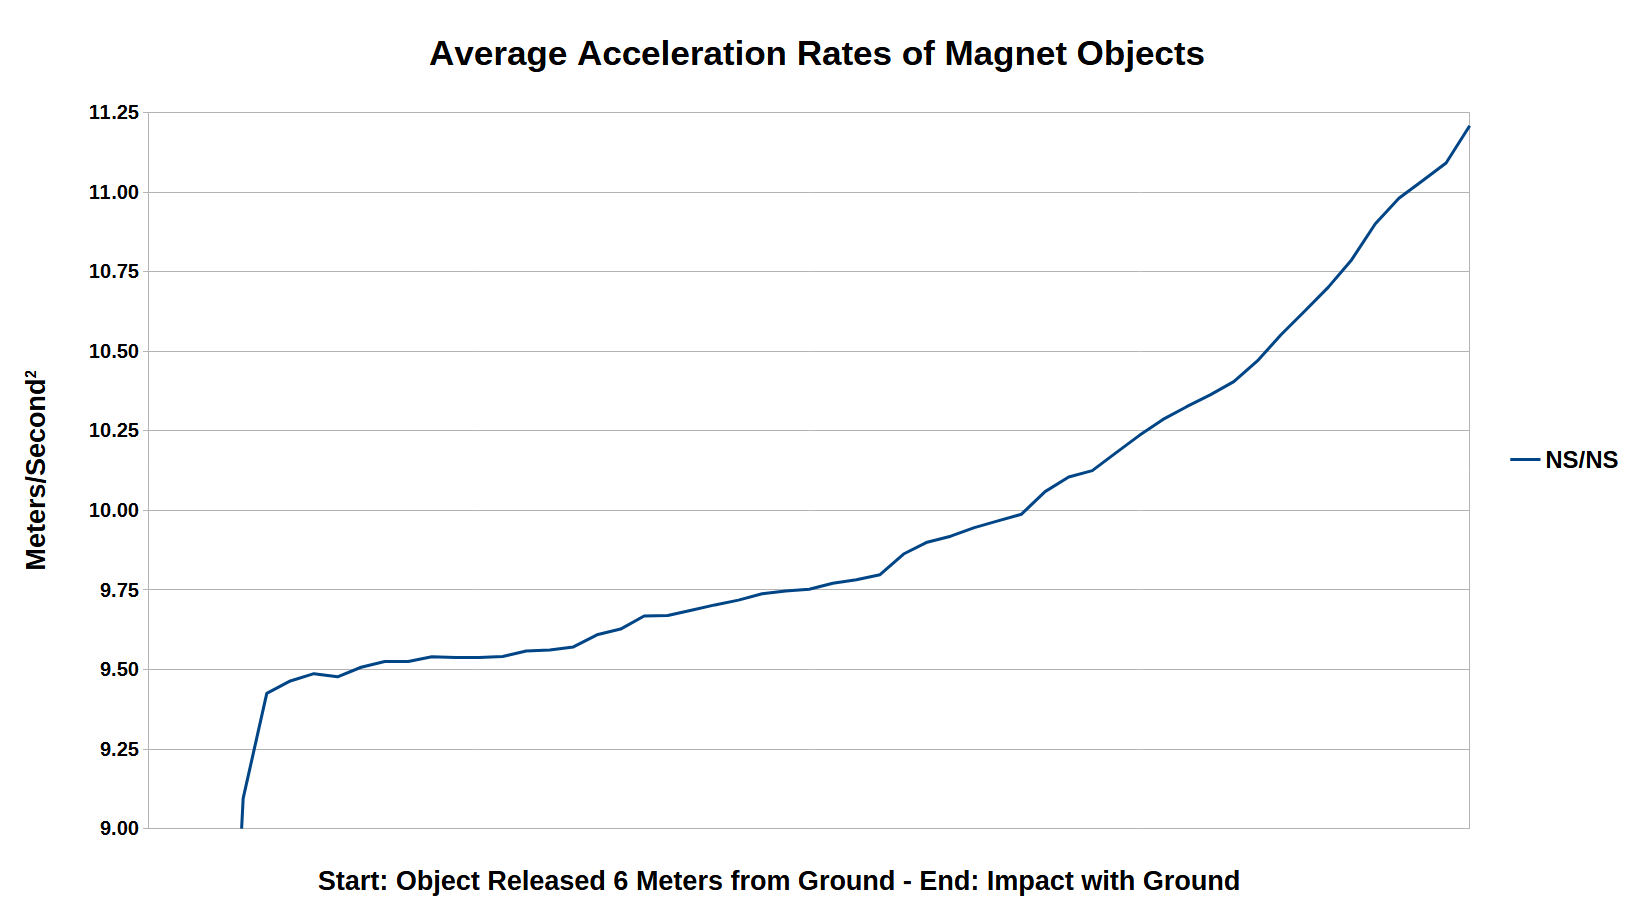
  • Average Acceleration: 11.3297 m/s2
  • Magnet: 2 x N42, 2″ OD, 1/4″ ID, 1″ thick
  • Height: 7 meters
  • IMU: BMI270
  • Replication Warranted: No

Why so little additional acceleration from the Mark 2 compared to the Mark 1 when the Mark 2 was falling an additional four meters?

Observing the free-falls the Mark 2 mostly fell sideways after about two meters and was no longer falling in the direction of north pole to south pole. Another possibility is the acceleration has reached a plateau based on the field strength of the two attractively coupled magnets.

In future experiments I will be using the Adafruit BNO055 IMU instead of the Arduino’s built-in IMU as it is reportedly very accurate and it has its own self-calibration routine.


  1. The Objects to be Tested
  2. Let’s Look at the Tool Requirements
  3. Let’s Look at the Material Requirements
  4. Manufacture Experiment Components
    1. Print the Magnet Free-Fall Object Shell
    2. Surface and Cut the XPS Foam
    3. Mill XPS Foam Plates 1 through 6
    4. Mill EPS Foam Container Plates
  5. Configure Arduino Nano and Serial Bluetooth Terminal App
    1. Install the Arduino IDE and Required Libraries
    2. Test the Arduino Nano’s IMU Accelerometer
    3. Upload the Code to the Arduino
    4. Install the Serial Bluetooth Terminal App
    5. Test the Arduino/Bluetooth App Connection
    6. Solder the Arduino Nano to the PowerBoost 500
  6. Assemble the Free-Fall Core
    1. Assembling the Attractively Coupled Magnets
  7. Assembling the Free-Fall Object
  8. Conduct Free-Fall Tests

1. The Objects to be Tested

One object will be tested in this experiment. It is:

  • NS/NS object composed of two magnets attractively coupled being dropped in the direction of north pole to south pole.

2. Let’s Look at the Tool Requirements

  • 3D Printer
  • CNC Router
  • Soldering Equipment

If you lack any of these tools they are usually available at a local Maker Space.

Another option is to buy a 3D printer, buy or build a CNC router, and buy soldering equipment for yourself. I am working on designing what I call, a MakeStation, a solid RFJ designed table with an RFJ tweaked MPCNC router mounted on top, a shelf on the bottom for placing a Creality Ender 3 V3 SE 3D printer residing inside an RFJ designed plexiglass box, and a pull out drawer for soldering as well as a place to house an ultracheap Chromebook for controlling the 3D printer and CNC router via a web browser.

Important note, I included .gcode files for the 3D printed plastic shell parts and for the milled foam encasement pieces. The .gcode files are specifically made for the Creality Ender 3 V3 SE and for the MPCNC Primo router respectively. In the 3D printer .zip files I also included Universal Cura Project .3mf files for those who use Ultimaker Cura along with plain .stl files for everyone else. For the milled foam pieces I included Autodesk Fusion 360 .f3z files along for importation into Fusion 360 where you can then generate the specific .gcode files for your CNC router.


3. Let’s Look at the Material Requirements

Item Price Quantity Total Location
Elegoo PLA Filament 1kg $16.19 1 $16.19 https://www.amazon.com/dp/B0BTGXDFRK
XPS Foam 1’x1’x0.79″ (Qty 4) $26.99 1 $26.99 https://www.amazon.com/gp/product/B0BRXZMVQS/
Magnet RY04X0 $77.45 2 $154.90 https://www.kjmagnetics.com/proddetail.asp?prod=RY04X0
Magnetic Pole Detector $5.99 1 $5.99 https://www.amazon.com/CMS-Magnetics-Magnetic-Detector-Identifier/dp/B00OQRG0HA
1/4″-20 x 4in. Aluminum Hex Bolt $2.72 1 $2.72 https://boltdepot.com/Product-Details?product=27439
1/4”-20 Aluminum Hex Nut $0.18 1 $0.18 https://boltdepot.com/Product-Details?product=27343
1/4” Aluminum Washer $0.18 2 $0.36 https://boltdepot.com/Product-Details?product=27373
Arduino Nano 33 BLE Rev2 $25.00 1 $25.00 https://www.amazon.com/Arduino-Nano-BLE-Rev2-ABX00071/dp/B0CNTVW44H/
PowerBoost 500 Basic $9.95 1 $9.95 https://www.adafruit.com/product/1903
3.7V 250mAh Lipo Battery (Reverse Polarity) $8.29 1 $8.29 https://www.amazon.com/dp/B0B7R8CS2C/
USB Lipo Charger $10.96 1 $10.96 https://www.amazon.com/gp/product/B00OKJFEQ2/
Micro USB B to USB A Cable $6.65 1 $6.65 https://www.amazon.com/Amazon-Basics-Charging-Transfer-Gold-Plated/dp/B07232M876/
28AWG Stranded Wire $6.39 1 $6.39 https://www.amazon.com/gp/product/B089CR4SDM/
M4 Nylon Phillips Pan Head Screws and Hex Nuts $12.99 1 $12.99 https://www.amazon.com/HVAZI-Phillips-Washers-Assortment-Black-M4/dp/B098QDHCDP/
EPS Foam 1’x1’x1.5″ (Qty 3) $18.99 1 $18.99 https://www.amazon.com/dp/B07RRDXVVM
Cardboard Box 6″x6″x6″ (Qty 6) $7.99 1 $7.99 https://www.amazon.com/dp/B0CTMSCFYN
Grand Total $314.54

4. Manufacture Experiment Components


4.a. Print the Magnet Free-Fall Object Shell

Download Mark 2 – Plastic Shells

Notice: Due to faulty record keeping, I am not sure if the data in My Results is recorded from dropping the non-fins or fins based plastic shell.

The plastic shell has a bullet shaped nose and the shell itself is 1.5mm thick. There are eight holes on the top and bottom of the shell for fastening them together with M4 x 25mm Nylon screws and hex nuts.


Mark 2 – Front Shell

Filament Used: 45g – 14.94m
Time to Print: 3 hours 1 minutes

Ultimaker Cura Settings
  • Walls > Wall Thickness > 2.0 mm
  • Infill > Infill Density > 50.0%
  • Support > Generate Support > Checked
  • Support > Support Structure > Tree
  • Support > Support Placement > Everywhere

Mark 2 – Front Shell with Fins

Filament Used: 49g – 16.35m
Time to Print: 3 hours 28 minutes

Ultimaker Cura Settings
  • Walls > Wall Thickness > 2.0 mm
  • Infill > Infill Density > 50.0%
  • Support > Generate Support > Checked
  • Support > Support Structure > Tree
  • Support > Support Placement > Everywhere

Mark 2 – Back Shell

Filament Used: 26g – 8.68m
Time to Print: 2 hours 9 minutes

Ultimaker Cura Settings
  • Walls > Wall Thickness > 2.0 mm
  • Infill > Infill Density > 50.0%
  • Support > Generate Support > Checked
  • Support > Support Structure > Tree
  • Support > Support Placement > Everywhere

Mark 2 – Back Shell with Fins

Filament Used: 37g – 12.43m
Time to Print: 3 hours 0 minutes

Ultimaker Cura Settings
  • Walls > Wall Thickness > 2.0 mm
  • Infill > Infill Density > 50.0%
  • Support > Generate Support > Checked
  • Support > Support Structure > Tree
  • Support > Support Placement > Everywhere

4.b. Surface and Cut the XPS Foam

Download XPS Foam Surfacing and Cutting Files

The XPS Foam acts as a shock absorber when the free-fall object hits the cushion on the ground. It serves to encase the control and magnet objects as well as providing a space to hold the Arduino Nano 33 BLE Rev2, Powerboost 500 Basic, and Lipo battery together so they do not move.

Surface the XPS Foam using the surfacing bit from the surfacing operation you performed on the Spoilboard for the MPCNC router. The surfacing bit is 1″ in diameter and the file XPS-Foam-Surfacing.gcode assumes you are using that bit. If you are using a different bit, open the XPS-Foam-Surfacing.f3z file in Autodesk Fusion 360 and change the bit used.

On the X-Axis place the clamps along the side to hold down the material. Make sure on the Y-Axis to place the left edge of the left most clamp at least 7″ from the left edge of the XPS Foam so the surfacing bit does not collide with the clamps. When it is finished remove the surfacing bit.

The file XPS-Foam-Cutting.gcode assumes you are cutting the foam with a 1/8″ milling bit. The X-Axis clamps can remain where they are from the surfacing operation. Place a Y-Axis clamp in between the left edge of the XPS Foam ensuring the right edge of the clamp is less than 3″ from the left edge of the XPS Foam. This will ensure the foam is clamped to the table and the milling bit doesn’t hit any clamps.

After the cutting operation is complete, remove the XPS Foam strip, move rest of the XPS Foam to the left up against the guide dowels, clamp the foam down and repeat the cutting operation. Two XPS Foam strips are needed to make the six Foam Plates.


4.c. Mill XPS Foam Plates 1 through 6

Download XPS Foam Milling Plates Files


Step 1 will mill the pockets in Foam Plate 1.

Step 2 will cut the inside out of Foam Plate 2 and 3 as well as cutting the outside of Plate 3.

Step 1 and 2 are accomplished by loading XPS-Foam-MIlling-Plates-1-3-Part-A.gcode into Octopi and running it. When complete remove the finished Foam Plate 3.

Step 3 requires you to flip over the foam strip. Adaptive Clearing will remove the material on this side and when finished Foam Plates 1 and 2 will be done.

Step 3 is accomplished by loading XPS-Foam-MIlling-Plates-1-3-Part-B.gcode into Octopi and running it. When complete remove the finished Foam Plates 1 and 2.

Step 4 requires you to place the second foam strip into the MPCNC. Adaptive Clearing will mill all the foam necessary to complete Foam Plates 4, 5, and 6.

Step 4 is accomplished by loading XPS-Foam-MIlling-Plates-4-6.gcode into Octopi and running it. When complete all Foam Plates are done and ready for use inside the plastic shell.

Step 1 – Top

Step 2 – Top


Step 3 – Bottom

Step 4


4.d. Mill EPS Foam Container Plates

Download EPS Foam Milling Files

The magnets are too strong and dangerous to just be left lying around on a table or in a drawer or something. I recommend buying some EPS foam, milling it to fit the assembled magnet object, and a cardboard box to place it all in, finally taping the box shut.


5. Configure Arduino and Serial Bluetooth Terminal App


5.a. Install the Arduino IDE and Required Libraries

In order to upload programs from your PC to the Arduino Nano you will need to install the Arduino IDE program available at the following address: https://www.arduino.cc/en/software

After it is installed you will need open the program and go to Sketch > Include Library > Manage Libraries

This will open a sidebar in the IDE.

Enter “IMU” in the search field.
Install the “Arduino_BMI270_BMM150” library.

Enter “HardwareBLESerial” in the search field.
Install the “HardwareBLESerial” library.

Go to Tools > Board: > Boards Manager

Enter “Mbed Nano” in the search field.
Install the “Arduino Mbed OS Nano Boards” library.


5.b. Test the Arduino Nano’s IMU Accelerometer

I ordered an Arduino Nano and the IMU unit would not initialize. Be sure to test the Arduino before soldering the Arduino to the PowerBoost. Connect the Arduino to your PC with a USB cable.

In the IDE go to Files > Examples > Arduino_BMI270_BMM150 and click on SimpleAccelerometer.
This will open the Accelerometer test program.

In the IDE go to Tools > Port: and select the COM Port that has (Arduino Nano 33 BLE)
In the IDE go to Tools and click on Serial Monitor to open the Serial Monitor tab in the program.
In the IDE then go to Sketch > Upload

After the program has compiled and uploaded to the Nano in the Serial Monitor tab it should print:

Accelerometer sample rate = 99.48 Hz

It will then start printing and endless number of lines of the X, Y, and Z data from the IMU accelerometer.


5.c. Upload the Code to the Arduino

Download Arduino Code – FreeFallBMI270-Mark2

I have written code for the Arduino that begins recording accelerometer data 100ms after the button to start it is pressed in the cellphone Bluetooth program. It will record for about 3.00 seconds which is more than enough time for a drop height of slightly over six meters. Attach your Arduino to your PC with a USB cable and upload the FreeFallBMI270-Mark2 sketch into it.


5.d. Install the Serial Bluetooth Terminal App

Install the App from Google Play Store

You will need to make some configuration changes to get Serial Bluetooth Terminal to work with the Arduino Nano code I have written.

Open the app and look at the bottom of the screen. You will see gray buttons with M1, M2, etc. We want to change the name of the button and the command that is sent when it is pressed.

For the four buttons being used the following configuration applies:

Edit Mode: Text
Action: Send
Repeat: Unchecked

Hold down button M1, it should open a configuration screen for the button.

Name: Start
Value: Start Trial

Hold down button M2

Name: Go
Value: Go

Hold down button M3

Name: Redo
Value: Redo Trial

Hold down button M4

Name: New
Value: New Trial Series

Hold down button M5

Name: Send
Value: Send

Then click on the three bars next to the word Terminal and select Settings

Terminal tab

Buffer size: Unlimited.

For the Receive tab

Newline: CR+LF

Send tab

Newline: None

Under Misc. is where you save the text data you receive from the Arduino. I would recommend using a different folder for each free-fall object tested. Click on Save + log folder, choose Custom and click Edit Custom.

I recommend creating a folder in Internal Storage > Documents > Mark 2 > NSNS in your cellphone’s file manager. In the Bluetooth app select that folder to Save the data. Don’t forget to click the Allow Access button at the bottom of the screen when you have selected a folder. It gives the Bluetooth app the permission to write the text files to that folder.


5.e. Test the Arduino/Bluetooth App Connection

Before assembling the Free-Fall Object lets test to make sure the Arduino program is working. The Arduino should still be connected to your PC through the USB cable and be powered on.

In the Serial Bluetooth Terminal app click on the three bars and select Devices. Click on the Scan button in the upper right corner. You should see a Bluetooth device named IMU BMI270. Click on it to connect to it. In the terminal window it should say “Connecting to”, then Connected. If you don’t see Connected appear then try clicking the icon to the left of the trash can to attempt reconnect.

Once connected click the Start button. You should see a line of text that says:

Trial 1 is ready. Clear terminal and press Go.

Clear the terminal by clicking on the Garbage Can icon, that will get rid of the unwanted text in the terminal so it doesn’t get saved with the accelerometer data in a text file. Do what it says, click the Go button.

After a couple seconds the program should have finished recording the accelerometer data. Press the Send button in the Serial Bluetooth Terminal app and you should see a bunch of data begin transmitting to your phone from the Arduino. Once it stops click the three dots and select Data > Save. This will save the terminal data to a text file in the directory you specified above.

Now that we know its working we can disconnect the USB cable.


5.f. Solder the Arduino Nano to the PowerBoost 500

How to solder is beyond the scope of this guide. If you do not know how to solder wires to circuit boards I recommend reading this informative guide with pictures to learn Soldering 101.

We will be using the the 24AWG wire from the materials list to connect the Arduino to the PowerBoost. I recommend using a black wire for Ground and Red wire for 5V.

As you can see in the image of Foam Plate 5 above there are parts milled all the way through the foam. Those are to hold the Arduino, the PowerBoost, and a Lipo battery that plugs into the PowerBoost. The small pocket not milled all the way through is where the wires between the Arduino and PowerBoost run connecting the two boards. The wires should be short and soldered from GND to GND and 5V to 5V.

Arduino Nano 33 BLE Rev2

PowerBoost 500 Basic


Now, when you begin free-fall tests you will attach the Lipo Battery to the PowerBoost 500 and tuck the three components into Foam Plate 5. The Lipo battery and PowerBoost will provide electricity to the Arduino and the Arduino’s onboard Bluetooth device will let you relay the Accelerometer data to your cellphone where it can be recorded and uploaded to the Cloud such as a Google Drive for further examination.

Make sure to keep the Lipo battery charged with the USB charger.


6. Assemble the Free-Fall Core

Ever free-fall object consists of a

  • 1 x 1/4″-20 x 4″ Aluminum bolt
  • 2 x 1/4″ Aluminum washers
  • 1 x 1/4″-20 Aluminum hex nut

The NS/NS object consists of two magnets attractively coupled with the bolt entering through the south pole side and exiting the north pole side where the hex nut is attached.


6.a. Assembling the Attractively Coupled Magnets

I strongly urge anyone replicating this experiment to email K&J Magnetics before ordering and tell them you want them to attach the attractively coupled magnets for you.

If you try to do this yourself you run the very real risk of injury or breaking the magnets. You only need two magnets for the attractively coupled test as they don’t rely on the bolt and nut to keep them together. You simply remove the nut and bolt and flip them around to test the drop from north pole to south pole or vice versa.

With the two magnets already assembled it is merely a matter of attaching the Aluminum bolt, washers, and hex nut so they should have identical mass with the other magnet objects since they are made of identical materials.


7. Assembling the Free-Fall Object

Take out the plastic shells you printed and place Foam Piece 1 into the bottom of the bottom plastic shell. Then Foam Piece 2 and Foam Piece 3. Starting with the Control tests, place the assembled Control Core in the bottom shell, then place Foam Piece 4 on top fitting it half way inside the shell. Connect the Lipo battery to the Powerboost powering up the PowerBoost and the Arduino Nano. Then place it in Foam Piece 5. Place Foam Piece 6 the top shell followed by Foam Piece 5.

Now proceed to use the M4x25mm nylon screws and M4 nylon hex nuts to attach the bottom and top shells together.


8. Conduct Free-Fall Tests

Connect your phone once more to the Arduino Nano using the Serial Bluetooth Terminal app.

Each trial follows the same process.

  • Click Start
  • Click Trash Can
  • Click Go
  • Wait about 3 Seconds to Record Data
  • Click Send and Wait for Data to Finish Transmitting
  • Click Three Dots
  • Click Data
  • Click Save

I added the Start button so you will know what trial number you are about to conduct and letting you delete that information from the screen so only accelerometer data gets saved to the text file.

If you intend to conduct more than twenty five trials per free-fall object then you will need to edit the Arduino file, the variable “numberTrials” and increase it.

If you intend to drop the objects from greater heights.then variable “numberSamples” will need to be increased. It is currently set to “300” which is approximately 3.00 seconds.

You may of course conduct as many trials per object and from whatever heights you desire but I would recommend heights of at least two meters to help determine if the NSNS magnet object ever plateaus in its acceleration during free-fall which I am sure got your attention and desire to replicate the experiment in the first place.